How-To: The Hanna Marin Look

Aloha, my elegant ladies.

How many of you watch Pretty Little Liars? Well…if you are like me, totally absorbed in all the secrets, scandal, thrill, and mystery of the show, this is a look inspired off of one of my favorite liars..Hanna Marin.

hanna

This is a look that should look great on everyone. Hanna sports a very sensual smokey-eye that is usually brown or black, paired with a pretty pink lip. With her wide blue eyes, golden curls, and flawless, alabaster skin, she looks very innocent, but the smokey eye gives her an unexpected edge.

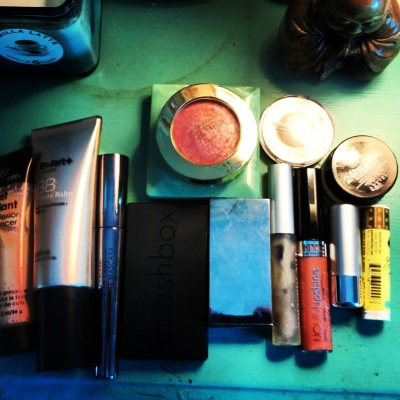
Here’s what you need to achieve an air of mystery:

IMG_4729

  • A coverage of your choice, but stray from anything super-matte! (Think fresh-face, NOT cake-face!)
  • Highlighter
  • A pretty pink blush
  • Brow definer (This is one step you shouldn’t skip!)
  • Eye primer
  • Brown eyeshadows (chocolates, ambers, taupes, ect.)
  • Black or brown eyeliner
  • Mascara (the blacker, the better!)
  • Light pink lipstick
  • Lipgloss (Optional)

The first step is to erase all your flaws, which is basically EVERYTHING, from crinkles, to wrinkles, to dark circles! Hanna’s skin is perfect, smooth, and luminous, what I like to call “baby-skin”. Make sure to work in thin layers, and blend, blend, blend. You want your skin to look fresh and radiant!

And before you think twice, a highlighter is a must-have for this look. Like I said, Hanna has super-glowy skin. Make sure you don’t go over-board, a little on the high points on the face is enough. Adding a layer of blush will give that extra touch, but make sure you pick a cream, satin, or matte formula, NO glitter.

Before we move onto the eyes, let’s give our brows some looove.! My brows are kind of sparse, so I filled them in. Make sure you arch your brows, because your eyes need a good frame. ;}

When you get to the eyes, make sure your lids are prepped and primed. This look is all about playing up your eyes, so you better prepare yourself.

First off, start layering your shadows. I started with a taupe on my lids, which is a super-universal color. Then I dabbed a soft brown on the outer third of my eye, and ended with a darker color in the crease. You want to feather these colors into each other, so it has a natural gradience. With the darker colors, you can build them up to a certain intensity, but you don’t need to go super harsh.

When we get to eyeliner, THAT’S where things start getting totes cray-cray. In my mind, Hanna’s eyeliner is her signature. In a lot of her looks, it’s really thick and smudged…the epitome of sultry! Draw on your line and smudge it with a Q-Tip or a brush, but only a little bit! Then line your waterline too; it makes a huge difference. But don’t forget about mascara, that’s just as important!

The final step is the easiest: Lipstick and gloss. Hanna’s lips are never super-bold, so stick with your soft, pearly pinks.

Aand now you’re finished, lovely. ❤

IMG_4745

PRODUCTS I USED:

  • Maybelline Dream Fresh BB Cream in “Light/Medium”
  • Femme Couture Get Radiant Complexion Enhancer (review here)
  • Milani Baked Blush in “Dolce Pink” (review here)
  • Clinique Brow Shaper in “01”
  • Urban Decay Primer Potion
  • We ‘N Wild Palette in “Comfort Zone” (review here)
  • Palladio Herbal Eye Liner in “Pure Black”
  • Covergirl Lip Perfection Lipstick in “Darling Chérie”
  • Femme Couture Super Juicies Sheer in “Clear”

Congrats, darling. You are now transformed into the sultry, sexy Hanna Marin. Just part your hair down the middle, curl it, and you’re ready to go find your Caleb.

I hope you guys enjoyed this inspired look…but I always thought I looked more like a Spencer. ;}

IMG_4746

IMG_4771

As you can see, the eyes are very intense. I love how the colors blended!

The lips were the easiest part, and sooo awesome!

The pink looked perfect with a topping of gloss, and made my lips look super plump.

IMG_4758

Anyway, I hope you all enjoyed this post!

Who’s YOUR favorite liar?

IMG_4747

KISSES.

x

How-To: Boosting Up Your Glam Factor

Hey Curly-Fries. ❤ ❤

Sorry I’ve been gone for so long…I’ve missed you all so much, but there’s a million things going on right now.

Let’s get started with this How-To!

Is it prom? A night for clubbing? A wild-cool party? Do you just want to look your best, but amplified? Sparkly? Sexy? Edgy?

Well, here’s some ways to boost your “Glam Factor”, which can mean so many things. Image

FIRST: What is a “Glam Factor”??

Your Glam Factor is something that you don’t have on your own. If you’re bored of your brown eyeshadows and nude lipsticks, this look is for you!! It’s fun, pretty, daring, and at times a little weird. It can be anything from a sparkly eyeshadow, to fun hair clips, to your tallest heels, or a slash of pink lipstick…and it’s totally YOU.

Customizable. Ever-changing. Beautiful. Imperfect. YOU.

Here’s what you need to take your inner diva into the spotlight:

  • Fun makeup
  • Accessories
  • Courage

I know you may look at these three things and think… “Mmm gurrl, ya know I need more than dat!” Well, hunnybun, like I said, this look is totally customizable!

Here’s some of my FAVORITE tips for upping the glam:

Gloss it up, sugar. Gloss. It. UP.!!! In my opinion, nothing is sexier on the lips than the perfect shade of gloss. For nights out, I love a nicely opaque, gloss with a diamond shine, something that will stay put.

Buttttt, if you’re not a glossy-girl, go for your favorite dramatic lipstick. I love reds. They’re so classic, and that slash of crimson is sometimes all it takes to feel sexy! best-high-fashion-makeup--large-msg-13432493965

P.S: Some more great things include SHIMMER and GLITTER. (The two are very different :} ). You could play around with some shimmery eyeshadows, dust glitter on your shoulders, mix some in your lipgloss… Just DO NOT over-do it. A little shimmer is subtle, cute, and fun. A lot of shimmer screams “hot mess”. Foto01

Other ideas include:

Hair up, colorful eyeliner, statement jewelry, fun nails, sequins, spikes, ice bling, a wrap, wristlet gloves, whatever you want!!!

You get it ;}

Got your bling-bling? Your keys? Your powder for touch-ups?

You’re ready to hit the town.

x

How-To: Finding the PERFECT Nude Lipstick

Okay, guys, seriously. It makes me NUTS to see someone wearing a nude color that makes it look like they ate a box of powdered donuts.

NUTS.

I mean, who wants to look like a total ice-queen? …UH HUH, guuuurrrl, dat ain’t you. (Unless it’s Halloween or something!)

35g18f

To most people these days, a nude lip means COMPLETELY ERASING YOUR NATURAL COLOR. Well, ladies, I’m glad to inform you that any natural-looking color (FROM PINK, TO PEACH, TO BERRY) can be certified as a “nude”.

So, here’s my Basic Nude Lip Guide for all skin tones under the sun!

nude lipstick

FAIR: When you’re pale, pale, pale, nudes that have a pink undertone will look best! Light rosy tones and soft peaches will look nice too…but STAY AWAY from anything flat beige!  Beige will wash. You. Out.

BUFF: Buff, or “beige, fawn, sandy,ect.” is a very common category to be in! If you have more warm, golden undertones, I suggest you work with caramel or honey-toned nudes, and not anything too silver. NO silver frost. NO white undertone. NO cool colors. NO grayish shades.

OLIVE: In my biased opinion, olive is a lovely skin color. I strongly suggest salmon pinks or golden bronzes to make your skin color POP!

TAWNY: You know what I’m talking about when I say tawny! Like that warm, golden caramel color, ya know? Think Beyonce! Halle Berry! Rihanna! Light pinks, creamy caramel colors, or golden beiges, all will look stunning on you! If you’re into glitter, look for something with gold flecks. :}

EBONY: For all darker girls out there, you can rock your chocolate and raisin shades, or warm bronzes!

Anyway, this is just some basic guidelines! Finding YOUR favorite is often like searching for a nice pair of jeans…it may take some time, and guaranteed trail and error!

Hope I helped!

Au revoir, chère!

x

How-To: “Hot Girl” Disguise

WARNING: This look isn’t too appropriate for school, work, first dates, or any casual event. Wear with caution!

Haha ‘ello loves!

If any of you have heard of Jenna Marbles (the Youtuber), you will know I borrowed the title “Hot Girl Disguise” from her! This is my own spin-off of her comical look, tweaked to my own level of wearability with some personality thrown in.

Ever wanted to be someone else for ONE NIGHT? Well, this look does just that. You’ll feel glamorous, a little outrageous, and over-all: FIERCE.

I mean, hey. I brought out the falsies, eyeliner, and favorite lipstick, so things should get pretty cray-cray.

Here’s what you need for your one-night identity:

IMG_2926

  • A favorite full-coverage foundation (time to bring out your expensive potions and lotions!) 
  • Eye primer
  • Black or dark-colored eyeliner with NO glossy finish
  • Hazy eyeshadows
  • Mascara
  • One succulent lip shade of your choice (I adore deep berries, wines, bubblegum pinks, any fun color that suits you!)
  • False lashes (Optional)
  • Lipgloss (Optional)
  • Fragrance (Optional)
  • A pair of sexy heels (SORT OF optional)

So the first part is easy: Just dab on your coverage. You’re basically creating a blemish-free, dark-circle-free, crease-and-crinkle-free look. Erase away all your imperfections!

When you’re done with that, you can move on to the eyes. Choosing dark, soft colors, start to enhance your eyes around the crease, slowly working down to the lid. You can pick any colors, from dark purples, to browns, to forest greens, to grays. One rule: NO solid black eyes. You want to look pretty, not panda.

If you’re into the liner, it’s better to make it softer and smudged for this look, not pristine and sharp. The eyes should be soft, not like every bit was slaved over. Even though I kept mine simple (with just three shades), GIRL, if you wanna, you can pull out the glitter, rhinestones, and drag-queen falsies for all I care. It’s YOUR Hot Girl Disguise, dahhling.

AND NOW, the lips. With lips, it doesn’t have to be complicated. I chose a deep, glossy berry color for this look, but if Barbie-pink is more your style, go for it!

Now, squeeze into your party dress, dab on your fragrance, and slip on your sexy six-inches.

You’re fabulous.

IMG_2960

PRODUCTS USED: 

  • Estee Lauder Double Wear Foundation
  • Clinique Stay-Matte Powder in “Stay Buff”
  • Maybelline Eyestudio Gel Liner in “Blackest Black”
  • Estee Lauder Double Wear Stay-In-Place ShadowCreme in “Gold Dust”
  • Urban Decay Eyeshadow in “Sin”,”Stray Dog”, and “Maui Wowie”
  • Real Colors Whiplash Ultimate Mascara in “Extreme Black”
  • Estee Lauder Pure Color Lipstick in “Violet Electra” (reviews and swatch here)
  • NYC  Liquid Lip Shine in “Fashion Avenue Fuchsia”

IMG_2943

As you can see, the eyes are lightly hazy, which makes them look really rich brown!

And the lips were easy-peasy, but I liked how plush and glossy they turned out.

IMG_2953

Aaaand here is my Hot-Girl Disguise. Feel free to customize it to your liking, my loves. ;}

Alas, I must frolic off to my boudoir to dream caviar dreams! Buhbye, my sweethearts.

x

How-To: A Natural Face

Hey my lovely, fresh-faced beauties!

In the makeup world, a natural, or “nude” face means fully-dressed. It shouldn’t be hiding your features, it should be enhancing them…which is why everyone can wear this look!

Simply put, you’re just playing up what you like about your face. Do you have large, expressive eyes? Perfect cheekbones? Glowing skin? Full lips? Pick ONE feature, because that feature should be the focal point.

Here’s what you’ll need to get that “natural” beauty:

IMG_2846

  • Foundation or coverage of your choice (BB Cream, mineral powder, ect.) 
  • Concealer
  • Pressed powder to set
  • A favorite blush/bronzer
  • Highlighter
  • Eye base or primer
  • Natural eyeshadow
  • Mascara
  • Brow powder and gel
  • Lipstick
  • Lipgloss

(P.S: You don’t have to use all of the products I mentioned..you can pick and choose what to add or take away!)

Anyway, let’s start!

The first step is simple, yet difficult, so prepare yourself! You need to create a perfect, smooth, flawless complexion.

I exfoliated my skin and put on some moisturizer first, so my skin would be prepped and primed. When you’re applying your coverage, be extremely careful! In one flash of a powder puff you can go totally cake-faced. (If you turned cake-faced, check out this past post for salvation.)

The next part is ten times easier! Blush and highlighter! I love a good blush…the right shade can make such a difference in how someone looks. I chose one with subtle gold veining, so it can really make my cheeks pop! The secret in a nicely flushed complexion is LESS is MORE, so be sure to tap off any excess of your blush brush! I usually add a light dusting of highlighter on the tops of my cheekbones.

In this look, I decided to play up my eyes. Before I added any shadow, I put on a cream base to intensify the colors I would layer over it. I chose dreamy, subtle colors that would really make my brown eyes glow. Then, because my brows are sparse, I filled them in and set them with a clear gel. The eyes are the windows to the soul, and windows need good frames! A wise Youtuber once said, “Your brows should be like sisters, not twins.”, so you shouldn’t go to extremes to make them look identical.

The final step is my personal favorite, the lips, one of the most seductive things about a face. Before any lipstick or gloss, you should have them exfoliated and moisturized. I chose a nude lipstick color, but you could pick any soft, natural color  you like. I like to add gloss on top too, it makes your lips look softer, younger, and plumper.

And you are dooooone, hun! ;}

PRODUCTS I USED:

  • Dr. Jart+ Premium Beauty Balm SPF 45
  • Mineral Fusion Concealer Duo in “Neutral”
  • Clinique Stay-Matte Pressed Powder in “Stay Buff”
  • Milani Blush in “Dolce Pink”
  • Wet ‘N Wild Color Icon Bronzer in “Reserve Your Cabana”
  • Maybelline Color Tattoo in “Barely Branded”
  • Smashbox Eyelights Palette in “Flash”
  • Real Colors Whip Lash Ultimate Mascara in “Extreme Black”
  • Zuzu Luxe Lipstick in “Ultra Suede”
  • NYC Liquid Lipshine in “Nude York City”

You should look and feel really fresh and confident, like you’re not wearing much of anything, but  still put-together and polished.

I hope you guys enjoyed this how-to. After all, it’s basically my everyday look in a nutshell!

IMG_2876

IMG_2867

Cheers!

x

How-To: Highlighting/Bronzing

Highlighting or, urm, “luminizing” is a trick that not everyone needs to know. Giving that extra glow is sometimes unnecessary, but who says it can’t be a useful trick to learn?

Image

Above is a basic highlighting/bronzing chart. Both of these products are all about building up intensity, you should NEVER, EVER just dust some all over and call it good. Take caution!

BRONZER 411

With bronzer, you shouldn’t be creating bones that aren’t there, you should just be enhancing what you naturally have. Plus, you should pick a color that complements your skin tone! If you’re pale, go for pinkier or peachier bronzers, stray from anything orangey (you’ll look all ruddy and gross.) If you’re darker, go for more cinnamon or golden tones!

Same goes for highlighter. Warm skin= warm, golden highlighter. Cool skin= pink highlighter. Neutral skin= your pick. Image

The most important thing with these two products is to find a formula that you like. Powders are the most popular, but they have creams, liquids, you name it!

No matter what formula, start with small patting or brushing motions, continuously building up the product until it looks good!

Hope I helped some! ^_^

Talk to you lovely people soon!

x

How-To: Smoky Eye

I don’t know anything sexier than a well-done smoky eye. Who can’t rock this look? It’s totally universal..just pick the right colors and your good to go.

Plus, it’s really carefree, smudgy, edgy, messy, ect. NOT nit picky. Have fun with it!

So here’s what you’ll need to achieve that seductive stare:

IMG_2343

  • An eyeshadow primer
  • Your favorite mascara
  • Eyeshadow colors of your preference (you need a lid color, a crease color, a dark, smoky color, and a highlight)
  • Optional: Eyeliner

First things first. Prime, prime, prime! Primer is one of the most important steps, so don’t skip it. QUICK TIP: Less is more. You don’t want a goopy, sticky mess on your lid from using too much product.

Now, the actual fun part. The eyeshadow! Take your lid color first and pat it on your lid. Easy-peasy, right? Now, go in with the crease color, shading in the crease of your eye. This should subtly make your eyes a little more dramatic. Then, taking your darkest color, and layer it over the crease color, blending it out to create a smoky gradience. You can layer more color until you get the feel you want, but don’t go totally Racoon-esque. Taking your highlight, dust it on your brow bone and in the corner of your eyes.

Next, put on your mascara. If you really want to, you can put a little eyeliner on your top lid and waterline, but it’s totally optional!

Aaand you’re done, hun. And you look SMOKIN’. ;}

IMG_2369 PRODUCTS USED: 

  • Urban Decay Eyeshadow Primer in “Original” 
  • Maybelline Expert Wear Eyeshadow in “Velvet Crush” with UD Eyeshadow in “Sin”
  • Whiplash Ultimate Mascara
  • Maybelline Eyestudio Eyeliner in “Blackest Black”

Anyway, smoky eyes are pretty chill. Mine’s very hazy and casual, but I love it. ❤

With smoky eyes, I strongly suggest you play around with fun colors. Because it’s a more, well, “smoky” look, it gives you a lot more flexibility to use bright shades on your lids to add an extra pop.

Thanks so much guys!!!. Talk to you soon.

x

How To Avoid The Cakeface

The Cakeface. No other makeup mishap has ever been as legendary. And gross.

In case you’re wondering: “What in the world is ‘The Cakeface’?”

Here’s some examples:

images

images

1805_1344437539

images

0,,43946434-EXH,00_thumb

snooki-no-makeup

As you can see, The Cakeface is not attractive. It’s either dry and flaky, or slick and shiny (like Snooki displays above). But sometimes The Cakeface is completely unavoidable. In one flash of powder, your face goes from flawless to frosting-face. Or maybe you got a little too generous with foundation. Either way, you aren’t happy with your look.

Here’s some tips and tricks on how to avoid the dreaded Cakeface.

  • FOR ONE: You need the right tools. Without good supplies, avoiding makeup mishaps is going to be a lot more difficult. You can use your pick of sponges, stippling brushes, kabukis, mineral powder brushes…anything that works for you! Got those? Great.
  • Also, you want to pick the right foundation, concealer, and powder for your skin type. Purchasing a primer or moisturizer to use under the makeup will be awesome as well, because then the product can melt into your skin much easier.
  • NEVER put concealer all over your face. This makeup is thick for a reason, for covering blemishes, dark circles, or scars. You DO NOT need to put it all over, that’s what a full-coverage foundation is for.
  • And last but not least, if you fear all is lost once you’ve ALREADY APPLIED your makeup, a spritz of MAC’s Fix+ will be your savior. Then, I like to take a piece of toilet paper and smooth it gently across the skin to remove any excess makeup.

Good luck, everyone! What makeup disaster do YOU hate?

x

How-To: PERFECT Red Lips

Red lips are a truly timeless, amazingly sexy trend. But now, according to Vogue: “Fuchsia is the new red.” Apparently it’s fresher, younger and more modern. But say WHAAT?

In my opinion, nothing can beat a kick-ass red lipstick.

So here’s what you’ll need to achieve that perfect red pout:

Image

  • A lip conditioner of your choice (Chapstick, salve, ect.)
  • One red lipliner
  • A red lipstick that you adore
  • Optional: A gloss

Okay, so the first step is easy. Just soften up those lips! If you have any dead skin or icky stuff like that, exfoliate first with a wet cloth, toothbrush, or lip scrub.

The next part is a bit trickier. Lining your pucker and filling it in. Gahhhd, this is my least favorite part. I always end up making one edge too thin, the other too thick, or drawing outside my actual lip line. But it’s possible to achieve. Just take your time! I like to soften out the edges of my lips when I draw them, to make my lips look fuller, softer, and more youthful and plump.

So now, fill in your lips with the lipstick of your choice! You can use a brush, or apply it straight from the tube. In my opinion, lip brushes are a bit too fussy.

NOW. You’re sort of done, unless you want to apply gloss. I LOVE gloss on a red lip. It makes your lips look so juicy and seductive! If it comes in a squeezy-tube thingy, you can put a little on your finger and gently spread it on top of the lipstick. You don’t want to disturb any product underneath the gloss!

And you’re done. Congrats :}

Image

PRODUCTS USED: 

  • Ganache For Lips Lip Balm in “Lemon Mousse” 
  • Beautique Lipliner in “Real Red”
  • MAC Lipstick in “MAC Red” (Satin)
  • Femme Couture Lip Luster in “Cherry Frost”

Image

Anyway, guys. I luv ya! Peace out! Image

x

How To Look Good in Pictures

Hi my adorables!

Have you ever looked back at super-old pics of yourself and CRINGED? Wondered what the heck you were thinking back then? Wanted to just wipe out those embarrassing year-books? Yeah, me too.

Want to know how to look good in pictures? Of course you do! Here’s my life-saving information:

Step 1: 

If you’re at a place where you KNOW people will be snapping pics left and right, wear a little makeup to conceal flaws and put the oil-slick skin at bay. You don’t have to wear a lot, just enough to look like you, but enhanced and confident. nomakeup-look

Step 2: 

Wear some clothes that make you feel attractive and comfy!! If you’re wearing a too-tight, white dress that pinches in all the wrong places, chances are you won’t look, or feel, so good. (That is, unless you’re a Victoria’s Secret angel.)

Wear something appropriate for the event, that goes with you’re body type and coloring. This will get rid of all worries about clothing problems!

rz12hf53

Step 3: 

Well, your facial expression usually plays a big part in how your photo turns out. If you’re having a good time, put on your best, genuine smile. In my opinion, everyone on this whole wide Earth looks better when they smile. Instead of ducking under a table, angle your face towards the camera and smile like you’re meeting a close friend. Or, make a funny-face! Have fun! It IS just a photo, after all.

images

Anyway, photos are photos. But, I hope these tips were somewhat-helpful, because these are things that I use all the time when I’m around cameras. Of course, you probably won’t look like Marilyn Monroe, OR a Victoria’s Secret angel, but you’re not supposed to! You’re unique. And you’re beautiful! When you look in the mirror, you can know that no one else looks like you, and that makes you special.

x